← Back to Agentic Workflow Guide
Chapter 2 The Agent
Configuring the atomic unit of every workflow
Before you build a multi-agent workflow, you need to master the building block: a single agent. A poorly configured agent in a multi-agent system is like a weak link in a chain — it degrades the whole system. This chapter teaches you how to configure an agent properly.
Every agent has exactly four configuration surfaces. Getting these right is the highest-leverage thing you can do.
| Config Surface | Question It Answers | Examples |
|---|---|---|
| Model | What LLM powers this agent? | GPT-4o, Claude Sonnet, Llama 3, a local model |
| Instructions | What does this agent know and focus on? | System prompt defining role, domain, constraints, output format |
| Tools | What can this agent do in the world? | API calls, code execution, file access, database queries |
| Reasoning Strategy | How does this agent think? | Direct response, ReAct loop, plan-then-execute |
2.1 — Model
The model is the LLM that powers the agent’s reasoning. This is the “brain” of the agent. Different models have fundamentally different reasoning capabilities, and choosing the right one matters.
Reasoning vs. Non-Reasoning Models
The most important distinction when selecting a model is whether it supports extended reasoning (also called “thinking” or “chain-of-thought”).
| Category | Examples | How It Works | Best For |
|---|---|---|---|
| Reasoning models | OpenAI o1, o3; Claude with extended thinking; DeepSeek-R1 | The model performs an internal chain-of-thought before answering. This “thinking” step is separate from the visible output and can be much longer. | Multi-step logic, math, code generation, exploitation, any task that benefits from deliberate planning |
| Non-reasoning models | GPT-4o, GPT-4o-mini, Claude Sonnet, Claude Haiku, Gemini Flash | The model generates a response directly. It can still reason in its output, but does not have a hidden thinking step. | Classification, routing, summarization, extraction, formatting, simple tool use |
Mixing Models Within a Workflow
One of the most powerful design decisions: different agents in the same workflow can use different models. You don’t have to pick one model for the whole system.
- Agent 1: Alert Classifier — fast, non-reasoning (just classification). Model: GPT-4o-mini (non-reasoning)
- Agent 2: Incident Investigator — complex reasoning needed. Model: o3 or Claude with extended thinking (reasoning)
- Agent 3: Report Writer — moderate capability. Model: GPT-4o-mini (non-reasoning)
The reasoning model is only used where it matters. The other agents use fast non-reasoning models.
2.2 — Instructions (System Prompt)
The system prompt is the single most important configuration of an agent. It’s the difference between an agent that works and one that doesn’t. The system prompt tells the LLM who it is, what to focus on, what to avoid, and how to format its output.
The Four Components of a Good System Prompt
| Component | What It Does | Example |
|---|---|---|
| Identity | Establishes the agent’s role and expertise level. | “You are a senior malware reverse engineer with 10 years of experience.” |
| Focus | Defines what the agent should pay attention to and analyze. | “Your task is to analyze binary executables for obfuscation techniques, hidden functions, and vulnerability patterns.” |
| Constraints | Sets boundaries on what the agent should not do. | “Never execute untrusted code directly. Never guess if you can use a tool to verify. If uncertain, say so explicitly.” |
| Output format | Specifies the structure of the agent’s response. | “Respond with: 1) Malware family or classification, 2) Obfuscation techniques identified, 3) Hidden functions or suspicious behavior found, 4) Key findings (IOCs, patterns), 5) Recommended next steps.” |
Good vs. Bad Prompts
"Classify security alerts."Problems:
- No identity: the LLM doesn’t know what level of expertise to assume
- No focus: what aspects of the alert should it look at?
- No constraints: can it make assumptions? Should it guess?
- No output format: will it return JSON? Prose? A single word?
"You are a security alert triage specialist at a SOC (Security
Operations Center). You have deep expertise in network security,
malware analysis, and incident classification.

For each alert you receive, analyze it and produce:

1. **Severity**: critical / high / medium / low / informational
2. **Category**: malware, intrusion, data-exfiltration,
   misconfiguration, false-positive
3. **Confidence**: A number from 0.0 to 1.0 indicating how
   confident you are in your classification
4. **Reasoning**: 2-3 sentences explaining your classification

Guidelines:
- Consider the source IP, destination, port, and protocol
- Cross-reference with known threat patterns
- If you are uncertain, classify as 'high' severity and
  explain why in your reasoning
- Never classify as 'informational' unless you are very
  confident it is benign"
The good prompt is longer, but every sentence serves a purpose. It eliminates ambiguity. The LLM knows exactly what to produce and how to handle uncertainty.
System Prompt vs. Human Prompt
Most agentic frameworks distinguish between two prompt fields:
| Field | Purpose | When It’s Used |
|---|---|---|
| System Prompt | Defines the agent’s identity, role, and behavior. Stays constant across all inputs. | Added once at the beginning of every conversation as a system-level message. |
| Human Prompt | The specific task or input for this execution. Usually contains template variables to inject dynamic data from the shared state. | Added as a user-level message after the conversation history. |
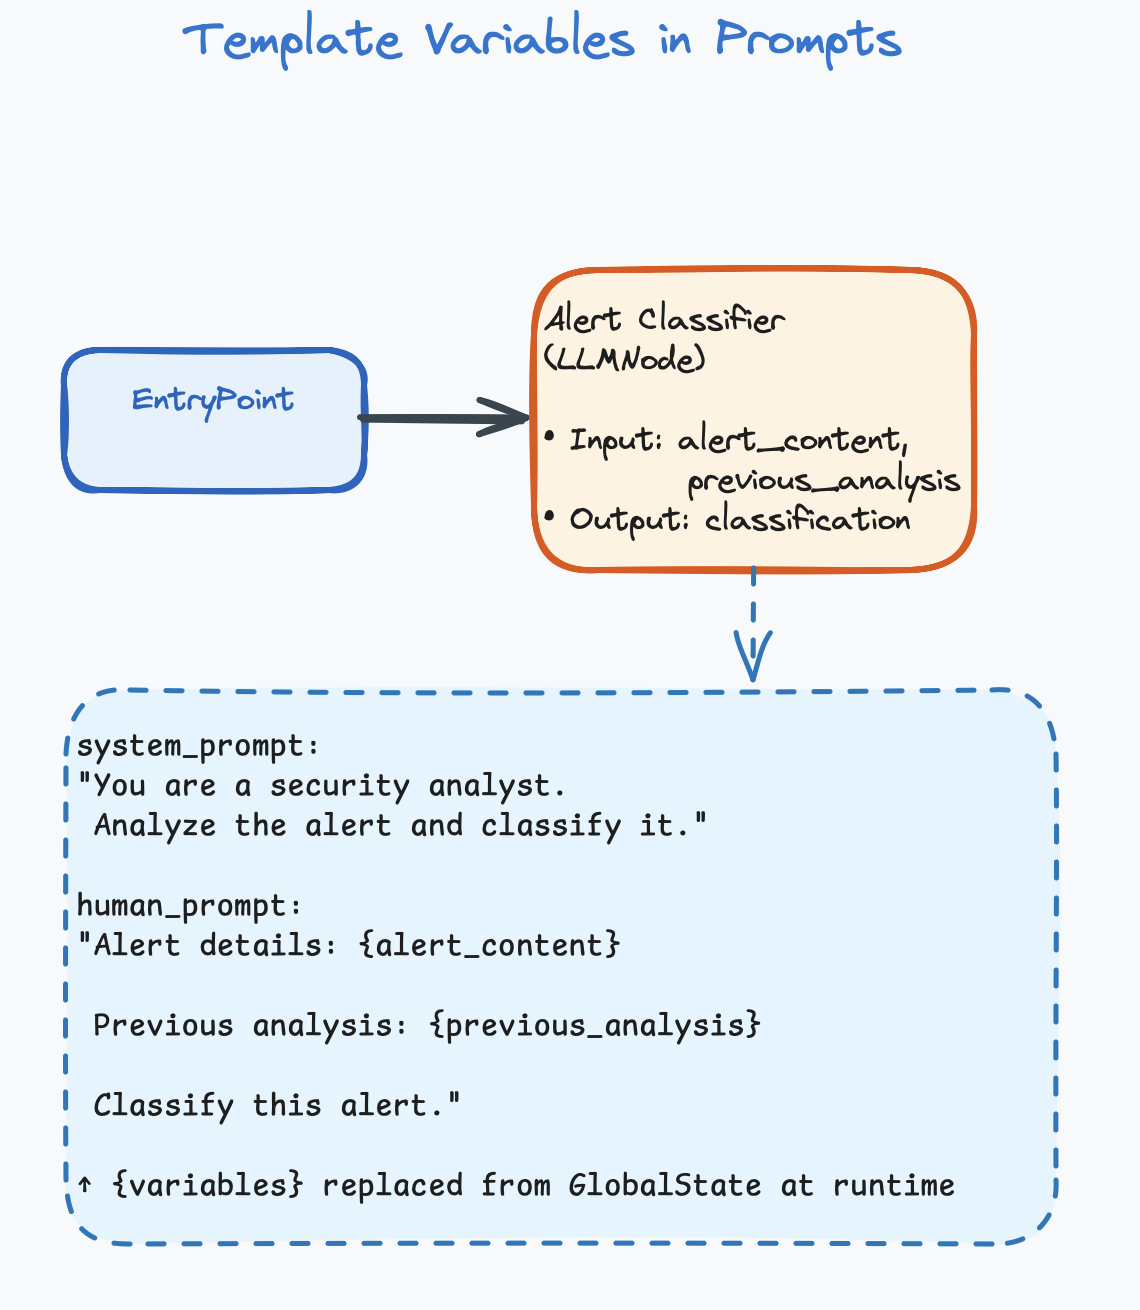
Template Variables
Prompts can include template variables that are replaced with
actual data from the shared state at runtime. Variables typically use
curly-brace syntax: {variable_name}.
System Prompt:
"You are a security analyst. Analyze the alert and classify it."

Human Prompt:
"Alert details: {alert_content}

Previous analysis from upstream agent: {previous_analysis}

Classify this alert."
At runtime, {alert_content} and {previous_analysis} are replaced with actual values from the shared state. For example, if alert_content = "SSH brute-force from 203.0.113.42", the LLM receives: “Alert details: SSH brute-force from 203.0.113.42”
This is how data flows into an agent. The template variables pull specific fields from the shared state (covered in detail in Chapter 5).
2.3 — Tools
Without tools, an agent can only generate text. It can reason, classify, summarize, and explain — but it can’t do anything in the real world. Tools give agents the ability to act.
What Is a Tool?
A tool is a function that the LLM can choose to call. You define the tool (its name, description, and parameters), and the LLM decides at runtime whether to use it, when to use it, and with what arguments.
# You give the LLM a description of a tool:
Tool: check_ip_reputation
Description: "Look up an IP address in threat intelligence databases.
              Returns reputation score and known associations."
Parameters: ip_address (string, required)

# The LLM receives a task:
"Investigate alert: suspicious connection to 203.0.113.42"

# The LLM DECIDES to call the tool (this is the key insight):
LLM output: {
  "tool_call": "check_ip_reputation",
  "args": {"ip_address": "203.0.113.42"}
}

# The system executes the tool and returns the result:
Tool result: {
  "reputation": "malicious",
  "score": 0.95,
  "associations": ["ransomware C2", "APT-29"]
}

# The LLM reads the result and continues reasoning...
The critical thing to understand: you don’t write code that says “call this tool at step 3.” You give the LLM a list of available tools, and it decides autonomously when and how to use them. This is what makes an agent agentic — it has autonomy over its actions.
Tool Categories
| Category | What It Does | Examples |
|---|---|---|
| Information retrieval | Fetches data from external sources. Read-only. | Query VirusTotal, search CVE database, read log files, list functions in a binary |
| Analysis / transformation | Processes data and returns derived information. | Decompile a function, run static analysis, parse a network packet, calculate a hash |
| Action | Modifies the environment. Has side effects. | Block an IP address, quarantine a file, submit a flag, send an alert |
| Communication | Sends data to other systems or humans. | Post to Slack, create a Jira ticket, send an email, call another API |
How Many Tools Per Agent?
# ❌ Bad: One agent, too many tools
Alert Analyst: [check_ip, check_domain, check_hash, decompile,
                list_functions, run_sandbox, block_ip, quarantine,
                search_logs, create_ticket, send_slack, submit_flag]
# 12 tools! The LLM will get confused.

# ✅ Good: Specialized agents, focused tools
Classifier:     [check_ip, check_domain]          # 2 tools
Malware Analyst: [decompile, list_functions, check_hash]  # 3 tools
Responder:      [block_ip, quarantine, create_ticket]    # 3 tools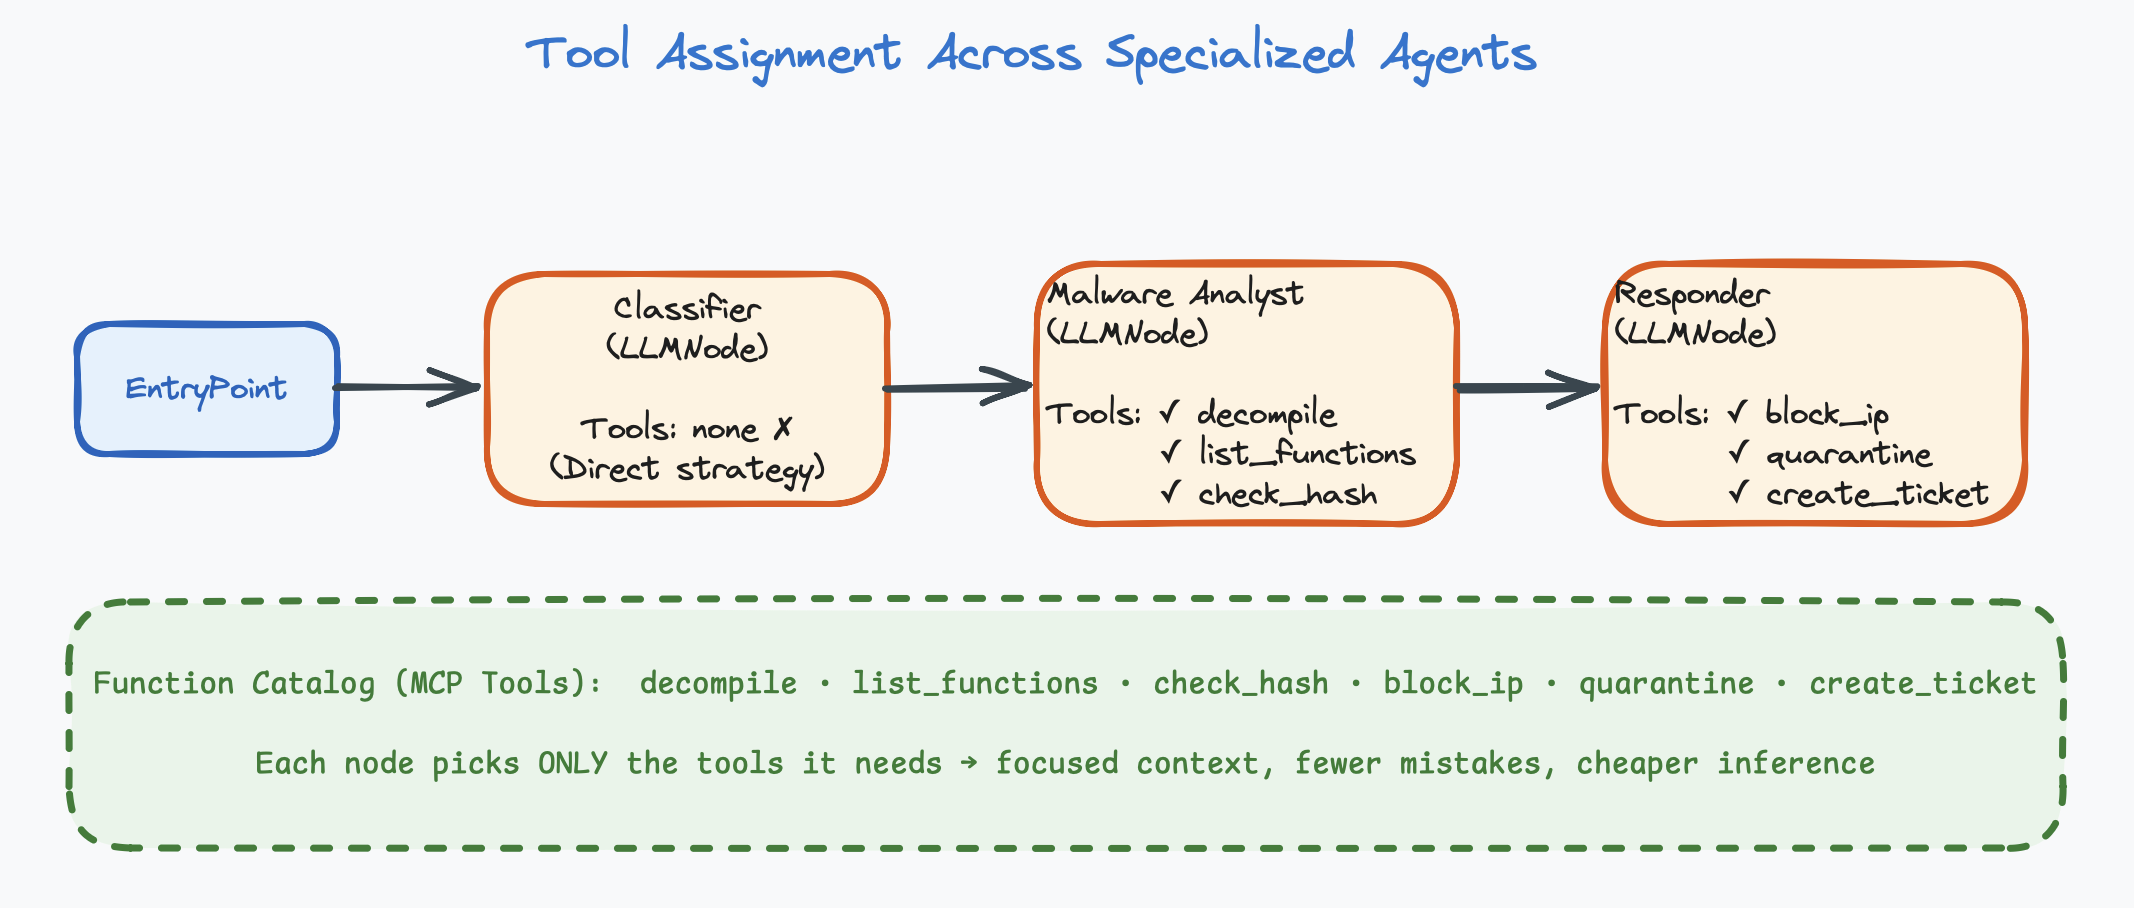
2.4 — Reasoning Strategy
How does the agent go from input to output? There are three primary strategies, each suited to different kinds of tasks.
Strategy 1: Direct (Prompt → Response)
The simplest strategy. The agent receives input, the LLM thinks once, and produces output. No tool calls, no iteration. One LLM invocation.
# How it works:
Input → LLM thinks once → Output

# Example:
Input:  "Alert: SSH brute-force from 203.0.113.42, 500 attempts in 10 minutes"
  ↓
LLM thinks once
  ↓
Output: {"severity": "high", "category": "intrusion", "confidence": 0.92}| Pros | Cons | Best For |
|---|---|---|
| Fast (one LLM call), cheap, predictable | Can’t gather external information, limited to what’s in the prompt | Classification, summarization, extraction, formatting, routing decisions |
An agent with no tools assigned uses the direct strategy.
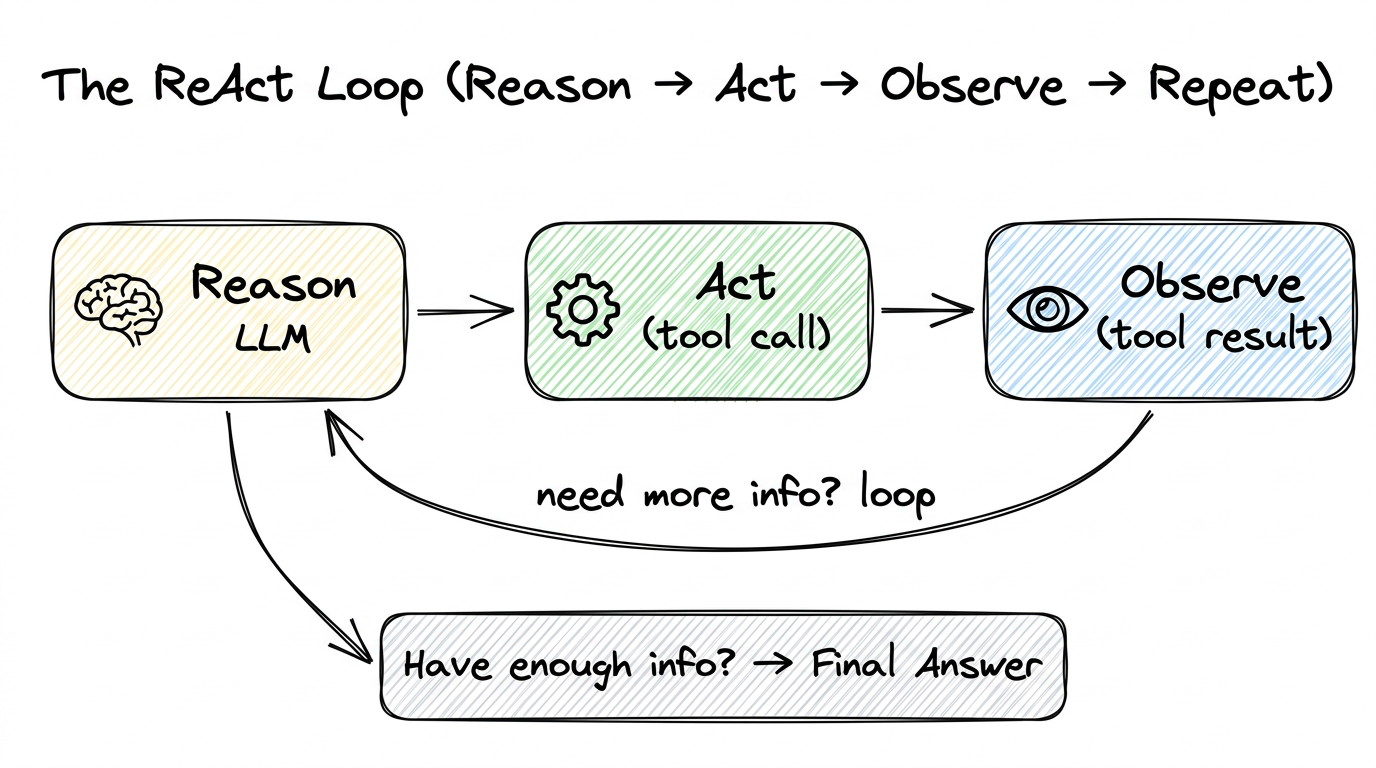
Strategy 2: ReAct (Reason → Act → Observe → Repeat)
The most common and most powerful strategy. The name “ReAct” comes from “Reason + Act.” The agent enters a loop:
- Reason — The LLM thinks about what information it needs or what action to take.
- Act — It calls a tool (an action in the real world).
- Observe — It reads the tool’s response.
- Repeat — Based on the observation, it decides whether to call another tool or produce a final answer.
Reason:  "I need to see what functions are in this binary."
Act:    call list_functions()
Observe: ["main", "check_password", "decrypt_flag", "obfuscate"]

Reason:  "'decrypt_flag' looks interesting. Let me see the code."
Act:    call decompile_function("decrypt_flag")
Observe: "void decrypt_flag() { char key[] = \"s3cr3t\"; ... }"

Reason:  "I can see the decryption key. Let me check the strings too."
Act:    call check_strings()
Observe: ["Usage: ./binary <password>", "Correct!", "Wrong!"]

Reason:  "I have enough info. The password is 's3cr3t'."
Final:  "The binary checks a hardcoded password 's3cr3t' in the
         check_password function. decrypt_flag uses this key to
         decrypt the flag."
Notice: the agent decided on its own which tools to call and in what order. You didn’t write “Step 1: call list_functions, Step 2: call decompile_function.” The LLM reasoned about what information it needed and planned its own investigation.
| Pros | Cons | Best For |
|---|---|---|
| Flexible, can gather information dynamically, adapts to what it finds | Multiple LLM calls (expensive, slower), can get stuck in loops, unpredictable number of steps | Investigation tasks, analysis, any task where the agent needs to gather information before answering |
An agent with tools assigned automatically uses the ReAct strategy.
The max_tool_iterations setting controls how many loops are allowed
(see Chapter 6).
Strategy 3: Plan-then-Execute
A variation where the agent first creates an explicit plan (a numbered list of steps), then executes each step. This gives the agent a “roadmap” and reduces wandering.
# Phase 1: Planning
Agent: "To analyze this binary, I will:
  1. List all functions to get an overview
  2. Identify security-relevant functions (password checks, crypto)
  3. Decompile the most promising function
  4. Extract the key/password
  5. Formulate my findings"

# Phase 2: Execution (follows the plan)
Step 1: call list_functions() → [main, check_password, ...]
Step 2: identifies check_password and decrypt_flag
Step 3: call decompile_function("decrypt_flag") → code
Step 4: extracts key "s3cr3t" from code
Step 5: writes final report
This is implemented through prompting: you tell the agent in its system prompt to first create a plan, then execute it step by step. It’s still using the ReAct loop under the hood, but with a planning phase at the beginning.
Running Example: Configuring Our First Agent
Let’s apply what we’ve learned to configure the first agent in our Security Alert Triage System: the Alert Classifier.
Model:        Non-reasoning model  (fast — classification is simple)

System Prompt:
"You are a security alert triage specialist at a SOC. You have
deep expertise in network security, malware analysis, and incident
classification.

For each alert, produce:
1. Severity: critical / high / medium / low / informational
2. Category: malware, intrusion, data-exfiltration,
   misconfiguration, false-positive
3. Confidence: 0.0 to 1.0

If confidence > 0.7, classify severity as 'high' and explain why.
Never classify as 'informational' unless confidence > 0.9."

Human Prompt:
"Classify this alert: {alert_content}"

Tools:          None  (direct strategy — classification only)

Strategy:      Direct  (one LLM call, no tools needed)
This agent is simple, focused, and cheap to run. In the next chapter, we’ll connect it to other specialized agents to build a complete triage system.
Chapter Summary
- Every agent has four configuration surfaces: model, instructions, tools, and reasoning strategy.
- Choose between reasoning models (deep thinking, multi-step logic) and non-reasoning models (fast, direct) based on task complexity.
- The system prompt is the highest-leverage configuration. It needs identity, focus, constraints, and output format.
- Tools give agents the ability to act. The LLM decides when and how to call them.
- Keep tools per agent to 2–5. More tools = more confusion.
- Three reasoning strategies: Direct (one shot), ReAct (tool loop), Plan-then-Execute (plan first, then ReAct).